Installing Asterisk From Source
One popular option for installing Asterisk is to download the source code and compile it yourself. While this isn't as easy as using package management or using an Asterisk-based Linux distribution, it does let you decide how Asterisk gets built, and which Asterisk modules are built.
AsteriskDownloads of Asterisk are available at http://downloads.asterisk.org/pub/telephony/asterisk/. The currently supported versions of Asterisk will each have a symbolic link to their related release on this server, named asterisk-{version}-current.tar.gz. All releases ever made for the Asterisk project are available at http://downloads.asterisk.org/pub/telephony/asterisk/releases/. The currently supported versions of Asterisk are documented on the Asterisk Versions page. It is highly recommended that you install one of the currently supported versions, as these versions continue to receive bug and security fixes.
Other Projectslibpri The libpri library allows Asterisk to communicate with ISDN connections.You'll only need this if you are going to use DAHDI with ISDN interface hardware (such as T1/E1/J1/BRI cards). DAHDI The DAHDI library allows Asterisk to communicate with analog and digital telephones and telephone lines, including connections to the Public Switched Telephone Network, or PSTN. DAHDI stands for Digium Asterisk Hardware Device Interface, and is a set of drivers and utilities for a number of analog and digital telephony cards, such as those manufactured by Digium. The DAHDI drivers are independent of Asterisk, and can be used by other applications. DAHDI was previously called Zaptel, as it evolved from the Zapata Telephony Project. The DAHDI code can be downloaded as individual pieces (dahdi-linux for the DAHDI drivers, and dahdi-tools for the DAHDI utilities. They can also be downloaded as a complete package called dahdi-linux-complete, which contains both the Linux drivers and the utilities. You will only need to install DAHDI if you are going to utilize DAHDI compatible analog or digital telephony interface boards.
Download LocationsUntarring the SourceWhen you download the source for libpri, DAHDI, and Asterisk you'll typically end up with files with a .tar.gz or .tgz file extension. These files are affectionately known as tarballs. The name comes from the tar Unix utility, which stands for tape archive. A tarball is a collection of other files combined into a single file for easy copying, and then often compressed with a utility such as GZip. To extract the source code from the tarballs, we'll use the tar command. The commands below assume that you've downloaded the tarballs for libpri, DAHDI, and Asterisk to the /usr/local/src directory on a Linux machine. (You'll probably need to be logged in as the root user to be able to write to that directory.) We're also going to assume that you'll replace the letters X, Y, and Z with the actual version numbers from the tarballs you downloaded. Also please note that the command prompt may be slightly different on your system than what we show here. Don't worry, the commands should work just the same. First, we'll change to the directory where we downloaded the source code:
[root@server ~]# cd /usr/local/src
Next, let's extract the source code from each tarball using the tar command. The -zxvf parameters to the tar command tell it what we want to do with the file. The z option tells the system to unzip the file before continuing, the x option tells it to extract the files from the tarball, the v option tells it to be verbose (write out the name of every file as it's being extracted, and the f option tells the tar command that we're extracting the file from a tarball file, and not from a tape. [root@server src]# tar -zxvf libpri-1.X.Y.tar.gz [root@server src]# tar -zxvf dahdi-linux-complete-2.X.Y+2.X.Y.tar.gz [root@server src]# tar -zxvf asterisk-11-current.tar.gz You should now notice that a new sub-directory was created for each of the tarballs, each containing the extracted files from the corresponding tarball. We can now compile and install each of the components.
Building and Installing DAHDI
|
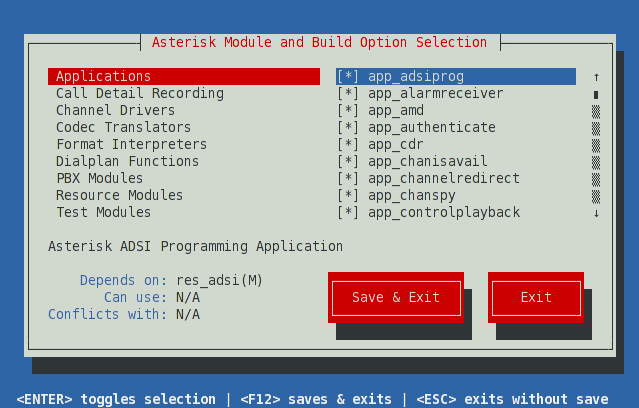
When you're first learning your way around Asterisk on a test system, you'll probably want to stick with the default settings in Menuselect. If you're building a production system, however, you may not wish to build all of the various modules, and instead only build the modules that your system is using.
When you are finished selecting the modules and options you'd like in Menuselect, press F12 to save and exit, or highlight the Save and Exit button and press enter.
Module Support Levels
Menuselect will also show the support level for a selected module or build option. The support level will always be one of core, extended, or deprecated. For more information on these support levels, see Asterisk Module Support States.
Menuselect Categories
Add-ons Modules that link with libraries that have licensing restrictions beyond what is allowed via the GPLv2 and Asterisk's dual licensing model. See README-addons.txt, delivered with Asterisk, for more information.
Applications Modules that provide call functionality to the system. An application might answer a call, play a sound prompt, hang up a call, and so forth.
Bridging Modules Modules that provide various bridge mixing technologies and other bridge related functionality.
Call Detail Recording Modules that provide Call Detail Record (CDR) drivers for various permanent storage backends.
Channel Event Logging Modules that provide Channel Event Logging (CEL) drivers for various permanent storage backends.
Channel Drivers Modules that provide communications with devices outside of Asterisk, and translate that particular signalling or protocol to the core.
Codec Translators Modules that provide encoding/decoding for audio or video. Typically codecs are used to encode media so that it takes less bandwidth.
Format Interpreters Modules used to save media to disk in a particular file format, and to convert those files back to media streams on the network.
Dialplan Functions Modules that are used to retrieve or set various settings on a call. A function might be used to set the Caller ID on an outbound call, for example.
PBX Modules Modules that implement dialplan functionality or enhancements.
Resource Modules Modules that provide additional resources to Asterisk. This can includes music on hold, calendar integration, database integration, various protocol stacks, etc.
Test Modules Unit test modules. These are typically only available when Asterisk has:
- Been configured with the --enable-dev-mode setting
- The TEST_FRAMEWORK compilation option has been selected in Compiler Flags - Development
Compiler Flags - Development Various compilation flags that alter Asterisk's behaviour. These flags are often useful in debugging Asterisk, or obtaining information for Asterisk developers.
Voicemail Build Options Compilation flags that enable different Voicemail (via app_voicemail) storage backends.
Utilities Various utilities for Asterisk. These include Asterisk Database upgrade utilities, Asterisk monitoring utilities, and other potentially useful tools.
AGI Samples Sample AGI applications.
Module Embedding Compilation flags to enable embedding of Asterisk dynamic modules into the Asterisk binary.
Core Sound Packages Core sounds used by Asterisk. Different sound formats can be selected in this menu; when Asterisk is installed, these sounds will be downloaded and installed.
Music On Hold File Packages Sample Music on Hold media used by Asterisk. Different formats can be selected in this menu; when Asterisk is installed, the various media samples will be downloaded and installed.
Extras Sound Packages Extra sounds that can be used by Asterisk integrators. Different sound formats can be selected in this menu; when Asterisk is installed, these sounds will be downloaded and installed.
Controlling Menuselect
Options in Menuselect can be controlled from the command line. Menuselect can be built without invoking the user interface via the menuselect.makeopts target:
[root@server asterisk-11.X.Y]# make menuselect.makeopts
Available options can be viewed using the --help command line parameter:
[root@server asterisk-11.X.Y]# menuselect/menuselect --help
Some of the more common options are shown below.
Listing Options
To list all options in Menuselect, use the --list-options command line parameter:
[root@server asterisk-11.X.Y]# menuselect/menuselect --list-options
To list only the categories, use the --category-list command line parameter:
[root@server asterisk-11.X.Y]# menuselect/menuselect --category-list
MENUSELECT_ADDONS
MENUSELECT_APPS
MENUSELECT_BRIDGES
MENUSELECT_CDR
MENUSELECT_CEL
MENUSELECT_CHANNELS
MENUSELECT_CODECS
MENUSELECT_FORMATS
MENUSELECT_FUNCS
MENUSELECT_PBX
MENUSELECT_RES
MENUSELECT_TESTS
MENUSELECT_CFLAGS
MENUSELECT_OPTS_app_voicemail
MENUSELECT_UTILS
MENUSELECT_AGIS
MENUSELECT_EMBED
MENUSELECT_CORE_SOUNDS
MENUSELECT_MOH
MENUSELECT_EXTRA_SOUNDS
To list the options in a category, use the --list-category command line parameter:
[root@server asterisk-11.X.Y]# menuselect/menuselect --list-category MENUSELECT_OPTS_app_voicemail
+ FILE_STORAGE
- ODBC_STORAGE
- IMAP_STORAGE
Enabling an Option
To enable an option in Menuselect, use the --enable command line parameter:
[root@server asterisk-11.X.Y]# menuselect/menuselect --enable IMAP_STORAGE menuselect.makeopts
Chaining Options
Multiple options can be chained together:
[root@server asterisk-11.X.Y]# menuselect/menuselect --enable app_voicemail --enable IMAP_STORAGE menuselect.makeopts
Disabling an Option
To disable an option in Menuselect, use the --disable command line parameter:
[root@server asterisk-11.X.Y]# menuselect/menuselect --disable app_voicemail menuselect.makeopts
Enabling a Category
An entire category can be enabled in Menuselect using the --enable-category command line parameter:
[root@server asterisk-11.X.Y]# menuselect/menuselect --enable-category MENUSELECT_ADDONS menuselect.makeopts
Build and Install InstructionsNow we can compile and install Asterisk. To compile Asterisk, simply type make at the Linux command line.
[root@server asterisk-11.X.Y]# make
The compiling step will take several minutes, and you'll see the various file names scroll by as they are being compiled. Once Asterisk has finished compiling, you'll see a message that looks like: +--------- Asterisk Build Complete ---------+ + Asterisk has successfully been built, and + + can be installed by running: + + + + make install + +-------------------------------------------+ +--------- Asterisk Build Complete ---------+ |
As the message above suggests, our next step is to install the compiled Asterisk program and modules. To do this, use the make install command.
[root@server asterisk-11.X.Y]# make install
When finished, Asterisk will display the following warning:
+---- Asterisk Installation Complete -------+
+                                           +
+    YOU MUST READ THE SECURITY DOCUMENT    +
+                                           +
+ Asterisk has successfully been installed. +
+ If you would like to install the sample   +
+ configuration files (overwriting any      +
+ existing config files), run:              +
+                                           +
+                make samples               +
+                                           +
+-------------------------------------------+
+---- Asterisk Installation Complete -------+
Security Precautions
As the message above suggests, we very strongly recommend that you read the security documentation before continuing with your Asterisk installation. Failure to read and follow the security documentation can leave your system vulnerable to a number of security issues, including toll fraud.
Advanced Build and Install Options
Customizing the Build/Installation
In some environments, it may be necessary or useful to modify parts of the build or installation process. Some common scenarios are listed here
Passing compilation and linkage flags to gcc
Specific flags can be passed to gcc when Asterisk is configured, using the CFLAGS and LDFLAGS environment variables:
[root@server asterisk-11.X.Y]# ./configure CFLAGS=-pg LDFLAGS=-pg
Debugging compilation
To see all of the flags passed to gcc, build using the NOISY_BUILD setting set to YES:
[root@server asterisk-11.X.Y]# make NOISY_BUILD=yes
Building for non-native architectures
Generally, Asterisk attempts to optimize itself for the machine on which it is built on. On some virtual machines with virtual CPU architectures, the defaults chosen by Asterisk's compilation options will cause Asterisk to build but fail to run. To disable native architecture support, disable the BUILD_NATIVE option in menuselect:
[root@server asterisk-11.X.Y]# menuselect/menuselect --disable BUILD_NATIVE menuselect.makeopts
[root@server asterisk-11.X.Y]# make
Installing to a custom directory
While there are multiple ways to sandbox an instance of Asterisk, the preferred mechanism is to use the --prefix option with the configure script:
[root@server asterisk-11.X.Y]# ./configure --prefix=/usr/local/my_special_folder
Note that the default value for prefix is /usr/local.
Other Make Targets
full This is equivalent to make or make all, save that it will perform a more thorough investigation of the source code for documentation. This is needed to generate AMI event documentation. Note that your system must have Python in order for this make target to succeed. This build target is only available in Asterisk 11 and later versions.
install Installs Asterisk, building Asterisk if it has not already been built. In general, this should be executed after Asterisk has successfully compiled.
uninstall Removes Asterisk binaries, sounds, man pages, headers, modules and firmware builds from the system.
uninstall-all Same as the uninstall target, but additionally removes configuration, spool directories and logs. All traces of Asterisk. As just noted, this will remove all Asterisk configuration from your system. Do not execute uninstall-all unless you are sure that is what you want to do.
clean Remove all files generated by make.
dist-clean Remove pretty much all files generated by make and configure.
samples Install all sample configuration files (.conf files) to /etc/asterisk/. Overwrites existing config files.
config Install init scripts (startup scripts) on your system.
progdocs Uses doxygen to locally generate HTML development documentation from the source code. Generated in the doc/ subdirectory of the source; see doc/index.html.
Installing Sample Files
Asterisk Sample Configs: not a sample PBX configuration
For many of the sample configuration files that make samples installs, the configuration contains more than just an example configuration. The sample configuration files historically were used predominately for documentation of available options. As such, they contain many examples of configuring Asterisk that may not be ideal for standard deployments.
While installing the sample configuration files may be a good starting point for some people, they should not be viewed as recommended configuration for an Asterisk system.
To install a set of sample configuration files for Asterisk, type:
[root@server asterisk-11.X.Y]# make samples
Any existing sample files which have been modified will be given a .old file extension. For example, if you had an existing file named extensions.conf, it would be renamed to extensions.conf.old and the sample dialplan would be installed as extensions.conf.
Installing Initialization Scripts
Now that you have Asterisk compiled and installed, the last step is to install the initialization script, or initscript. This script starts Asterisk when your server starts, will monitor the Asterisk process in case anything bad happens to it, and can be used to stop or restart Asterisk as well. To install the initscript, use the make config command.
[root@server asterisk-11.X.Y]# make config
As your Asterisk system runs, it will generate logfiles. It is recommended to install the logrotation script in order to compress and rotate those files, to save disk space and to make searching them or cataloguing them easier. To do this, use the make install-logrotate command.
[root@server asterisk-11.X.Y]# make install-logrotate
Validating Your Installation
Before continuing on, let's check a few things to make sure your system is in good working order. First, let's make sure the DAHDI drivers are loaded. You can use the lsmod under Linux to list all of the loaded kernel modules, and the grep command to filter the input and only show the modules that have dahdi in their name.
[root@server asterisk-11.X.Y]# lsmod | grep dahdi
If the command returns nothing, then DAHDI has not been started. Start DAHDI by running:
[root@server asterisk-11.X.Y]# /etc/init.d/dadhi start
Different Methods for Starting Initscripts
Many Linux distributions have different methods for starting initscripts. On most Red Hat based distributions (such as Red Hat Enterprise Linux, Fedora, and CentOS) you can run:
[root@server asterisk-11.X.Y]# service dahdi start
Distributions based on Debian (such as Ubuntu) have a similar command, though it's not commonly used:
[root@server asterisk-11.X.Y]# invoke-rc.d dahdi start
If you have DAHDI running, the output of lsmod | grep dahdi should look something like the output below. (The exact details may be different, depending on which DAHDI modules have been built, and so forth.)
[root@server asterisk-11.X.Y]# lsmod | grep dahdi
dahdi_transcode  7928 1 wctc4xxp
dahdi_voicebus  40464 2 wctdm24xxp,wcte12xp
dahdi          196544 12 wctdm24xxp,wcte11xp,wct1xxp,wcte12xp,wct4xxp
crc_ccitt        2096 1 dahdi
Now that DAHDI is running, you can run dahdi_hardware to list any DAHDI-compatible devices in your system. You can also run the dahdi_tool utility to show the various DAHDI-compatible devices, and their current state.
To check if Asterisk is running, you can use the Asterisk initscript.
[root@server asterisk-11.X.Y]# /etc/init.d/asterisk status

asterisk is stopped
To start Asterisk, we'll use the initscript again, this time giving it the start action:
[root@server asterisk-11.X.Y]# /etc/init.d/asterisk start

Starting asterisk:
When Asterisk starts, it runs as a background service (or daemon), so you typically won't see any response on the command line. We can check the status of Asterisk and see that it's running using the command below. (The process identifier, or pid, will obviously be different on your system.)
[root@server asterisk-11.X.Y]# /etc/init.d/asterisk status

asterisk (pid 32117) is running...
And there you have it! You've compiled and installed Asterisk, DAHDI, and libpri from source code.